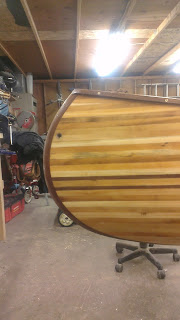
Wednesday, July 17, 2013

Maiden Voyage

So the canoe is done (sorta) and ready to glide through water for the first time.  We had an absolutely wonderful day outside, so I took a few pictures at home, and then some pictures during the madden voyage.


It was a sad moment when I had to put the ugly lime green license on it...but it has to be done...  The seats are webbed with 2 inch webbing fastened to the bottom of the seats with more of the brass screws and washers.  Its a simple, effective, and comfortable way to do a seat!


I also put a keel on which I think I forgot to talk about.  I cut it 3/4 x 3/4 and used two pieces of birch I had.  I would have prefered to use walnut as I think it would have looked a bit cooler, but I was all out of walnut and still have some birch...yeah.

I sealed all sides of the birch before I screwed it to the hull of the canoe, and then varnished over it.  I like the idea of applying the keel at the end of the build because if/when the keel needs to be replaced, it will be easy to do so.


So for the maiden voyage, my wife really wanted to go.  I think it had more to do with marking the milestone of me being done with it than anything else!  :)  I also got one of the 2 twins (Hannah) to come along for the ride.  Just a short paddle, but it was great to see how she handled.


A few pictures of the canoe on shore, and we called it a day!


Varnish and Finishing Touches

So am I finally ready to varnish?  At this point, my mind was spinnning.  There is that constant thought process of all the little things you can tinker with in order to make the canoe better, smoother, prettier, lighter....anything and everything, but they all take time.  At the time, our summers up here are not very long, and the push to get the canoe in the water over the 4th of July weekend was strong.

Putting that first coat of varnish on was very satisfying!  I used Z-Spar 2015 Flagship Varnish which seems to be one of the better varnishes you can use. It has a UV blocker in it which should help the canoe continue to look good for a long time. The canoe shines brilliantly once again!


I have one coat of resin and farnish on the seats, thwarts, and the yoke all before installing them.  I also added one last detail that was inspired by my brother.  I asked my wife who has much better handwriting than I do, to use a wood burner and burn in a fish measuring ruler into the rear thwart.  I spaced it a few inches in from the end so I could adjust it while installing it.  I have it set up now so that when you touch the fishes lips to the gunnel, it accurately measures your fish.  


The manufacturer recommends that I apply up to 4 coats of varnish.  I have 2 coats on it as of my July 4th launch.  I plan on putting one more coat on before a mid-August Boundary Waters trip, and then ill add any other necessary coats this winter.


Wet Sanding

So my brother came to with me with a good piece of advice. Rather than install all of the seats and thwarts like I had planned, we should wet sand and varnish the canoe without the seats installed....why work around them right?  So, I talked him into coming over one night and we got the entire outside of the hull sanded.  The inside took me about a week to get around to, and I finished that in 2 nights of work by myself.

The process for this is interesting.  My brother had done this before, so he said to draw all over the canoe with a black marker.  Once the marker is sanded off, you know you got that spot!  This seems to work well.  With wet sanding, it has hard to tell where you have sanded and where you haven't....so with the marker, it makes it easier to figure this out, and gives you an idea of how long to sand in each spot.


It's an easy enough step, but afterwords the canoe looks kind of dull.  I was very excited to get that first coat of varnish on and make it shiny again!

I deffinately learned while sanding that next time I need to be a little bit better with the runs in the resin!  For the most part, I didnt have any that were too bad...I had some bad runs when I put on the wet gunnells.  I think I went to bed as soon as i put them on when I should have checked for sagging resin for a half hour or so which would have save me TONS of time with sanding!  This was the time though to sand out any runs in the resin and make it nice and smooth for the varnish.  The inside took quite a bit longer with the concave shape, and its easy to tell yourself it wont matter once you start sliding around your Duluth Packs, but I kept telling myself that the inside was all I would be staring at on the canoe as I paddled mile after beautiful mile!

At this point, I realized I had a couple of things to finish up on the hull still.  I wanted to add the hole for connecting a rope onto the canoe, and I wanted to add a plaque with my name saying that i built the canoe. I think both of these ideas came from Gilpatrick's canoe making book.  The plaque was printed onto a regular sheet of white computer paper.  I played around with it a few different times, but finally figured out how to get it onto the hull, and looking somewhat transparent and "natural".  I put a thin layer of resin on the canoe where I wanted the plaque to go.  For me, i put it on the inside, down low behind the rear seat.  I wanted it to be something that you could easily show off, and yet something you wont be looking at all the time.  So with the thin layer on the hull, I also put a thin layer on the backside of the oval piece of paper.  I then positioned it on the hull how i wanted, and used my squeegee to press out the bubbles and keep it in place.  A second coat of resin over the top the next day and it was all done!


For the holes for the ropes, I used a 1/2 inch piece of copper pipe.  I drilled a 5/8 inch hole from both sides and put the piece of copper through the hull and inner stems for good strength.  I then used a pencil to trace a flush line on each side, pulled the pipe back out, and cut it off flush with the pencil lines with a hacksaw.  After i made sure everything was ok, I cleaned up the burrs with a wire wheel, and epoxied them into place! 


 The seem to work great, and I love how simple and clean they look.

Gunnels Part II

Alrighty...so busy as always is too busy.  The canoe is done!  I launched it only July 4th...needless to say, I hope to update rest of blog tonight so you can all see what I've been up to.  So last I left you, I was finishing up the gunnels and decks.  After I had the gunnels dry fitted, I took them off of the canoe and applied a coat of resin to the backside of them, I then applied them to the canoe with the resin still wet.  My idea behind this was that I knew that I needed the inside of the scuppered spaces to be sealed with resin, and did not enjoy the thought of coating it while on the canoe with just the 1/4 space to work in.  I also figured that the wet resin on the backside of the blocks would act as a glue and bond the gunnels to the hull nicely.  One way of thought says that the better the gunnels are attached to the hull, the stronger they are.  The other way of thought says that if they get damaged, you want them relatively easy to remove and replace...so I figured just using the resin and screws might be a happy medium.


The accenting of the tiger maple turned out ok.  I did some reading on it and it appears that in order to really make the grain pop, you should add some dyes to it.  I didn't have any, nor did I want to deal with it right now.  Applying the resin made the grain pop some, but you have to look it at the right angle to really see how cool it is.  Otherwise, it pretty much looks like the birch I used for the seats and thwarts, so no one really every really know the difference!